Using Caddy in Kubernetes
If you are simply looking for the instructions you can skip to them.
Introduction
Whether it is for your own personal home page, for on-premises small business web services or for a larger enterprise, hosting a web service can be quite daunting to set up and maintain. You have a web server to think about, maybe even a reverse proxy if you are hosting multiple services under one domain name. And, don't forget the SSL certificates!
Fortunately, for a while now we have been blessed with the existence of Caddy. Caddy is a reverse-proxy, web server and LetsEncrypt-using Swiss army knife that automates away most of your needs in those areas, allowing you to serve a website with working HTTPS in (possibly) minutes.
Caddy is an especially great option if you have no need for a huge versatile infrastructure (yet). But, you recently heard of that fancy new thing called Kubernetes (k8s) that people have been raving about, and you wanted to try that out for yourself too.
Fortunately, Caddy has a Docker image, so it is pretty easy to set it up in your cluster. There are two main ways to set it up.
One of them is simply setting up Caddy pods per namespace and configure it to expose your deployments. This approach will be familiar for anyone that has used Caddy before, especially if you set it up in Docker before.
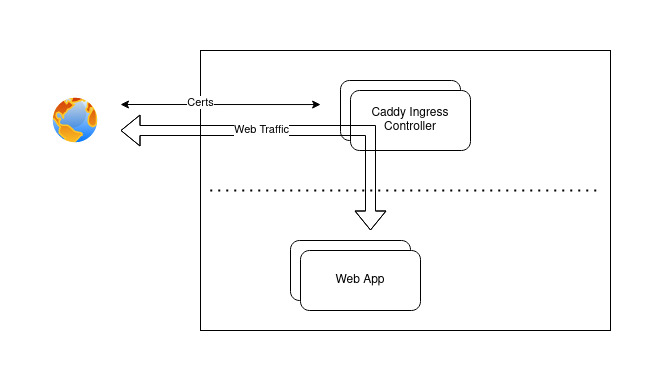
But, this time, I'd like to look at the other main approach, which is the (albeit still experimental) Kubernetes Ingress controller.
Two main advantages of using the Ingress controller:
- You can share it across all namespaces
- It integrates more naturally in the Kubernetes workflow
First time?
For most people that have worked extensively with Kubernetes (k8s) this will entire section will be obvious. Since rolling out this solution was the first time in a while I had used k8s, some of my knowledge was rusty and I had many misconceptions to clear. Since I assume I am not the only one, I am spending some time on explaining the K8s basics and how they relate to the Caddy Ingress controller.
The story starts with Pods, the basic entity that runs your web software. Most of the components of your web applications will run in these.
Deployments are the method you use to describe the state in which you want the pods to be. For most cases this is one pod, but this is where you 'horizontally scale' your service if one pod is not enough.
However, unlike for example when using Docker, this is not enough to get your service to even be recognized inside the cluster, let alone outside of it. For the inside half of this you need a Service. It makes your application routable inside the cluster, so that your database is available for your web application [^1].
Finally, some of these Services will be your actual web server, that you want to expose to the big, bad internet. This is done through an Ingress. This Ingress is provided through an Ingress Controller. This is where the magic sauce is. We will be looking at setting up the Caddy Ingress Controller.
[^1] The former of which should be deployed using a StatefulSet. This is opposed to the ReplicaSet used internally by your Deployment by default.
Setting up the Caddy Ingress Controller
As this is what I've used to set up the web service you are reading this from, we will be using MicroK8s (µk8s) as the Kubernetes cluster we will set this up on. As you will see the differences are minor and where things are different I will point it out so that you know where you need to adapt if you are using something other than µk8s.
I will assume you have µk8s installed and running on your machine. If not, go here and follow the guide until at least step 4. Please be aware that you do need working internet connectivity already, so make sure there are no firewalls, NAT devices, etcetera in the way. Caddy cannot fetch certificates if this is not arranged and you will lose a lot of time if you do not check this beforehand.
Instructions
- Install the
dns,metallbanddashboardaddons for µk8s, if not already present:
microk8s enable dns metallb dashboard
We now turn ourselves to the Caddy Ingress controller's installation instructions. However, we need to divert a bit from their instructions, so please follow the instructions hereafter. Just so you know and because I do not want to commit plagiarism.
- Download the Caddy Ingress controller source code.
git clone https://github.com/caddyserver/ingress.git \
  && cd ingress
- Generate the Helm chart. If you do not know what a Helm chart is, the idea is basically that it will generate
yamlfiles that completely configure the Caddy Ingress controller. It, like other applications, also consists of Pods, Deployment(s), etcetera.
helm template mycaddy ./charts/caddy-ingress-controller \
  --namespace=caddy-system \
  > mycaddy.yaml
This generates a yaml file that we want to modify a bit.
- Modify the following things in the generated
mycaddy.yaml:- Fill in the
acmeCAfield under theConfigMapentry. The ACME CA is the URL to the ACME instance that is handing out LetsEncrypt certificates. It is always advised to use the staging environment while trying things out like we are doing, so grab the staging environment URL from here. - In the same entry, set
debugto"true". This will be useful during debugging, Make sure you turn debugging off again when you are running things in production. - Set your email in the
emailfield, again the sameConfigMapentry.
- Fill in the
- Apply the configuration:
microk8s kubectl apply -f mycaddy.yml
- That's it! Check that the ingress controller is running by checking the Dashboard:
microk8s dashboard-proxy